
This is a fairly quick run-down about re-sharpening a cross-cutting blunt saw that is otherwise in good condition.
For a 300mm (12inch) tenon saw, you will need a 150mm (6in) slim, double-taper saw file. It should not be much bigger or you will have very rounded gullets.
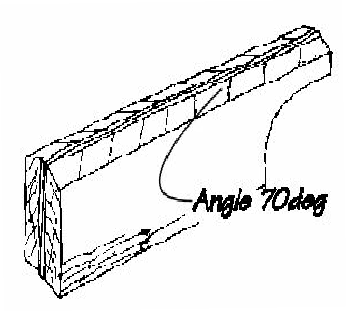
Make a pair of saw chops (right) similar to those in the drawing. Note the 70° guidelines on the top. They should help to keep a constant filing angle.
70° is a compromise between the option of angles that can be between 65° and 75° according to the user's needs
To get a good grip along the entire plate, plane the inside faces slightly concave.
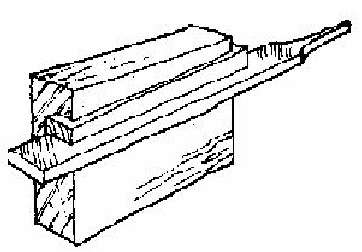
File holder
To keep the file square to the saw plate, wedge its edge into a groove cut into the face of a suitable wooden block.
For the smaller tenon and dovetail saws, an oilstone slip will be less severe.
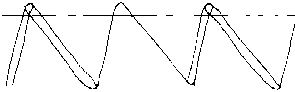
The first operationis ‘top’ the teeth by removing the rounded edges of the blunt teeth (right) and provide a set of triangular 'shiners' that serve as a reference during the sharpening.
Align a fine file (preferably a single-cut mill file lengthwise on top of the teeth, and remove the rounded edges, ie down to the line shown in the top drawing.
Work until each tooth has been touched, but go no further than this.
If a number of teeth remain untouched, you have a saw that really needs re-shaping.
If pressed, you can possibly put up with a few bad teeth for the time being so don't spoil the saw by filing too much away.


If re-sharpening a newish saw, it can be difficult to see where you have already filed. Some people find it useful to blacken the teeth with a sooty candle flame. Remove the soot from the shiners, but leave the gullets black.
With the saw handle to the right, settle the saw and the clamp in the vice. If there is too much projecting blade above the top of the clamp, say more than 6mm (1/4in), the metal is likely to shriek. This will not do the file any good either.
Try to sit while working, otherwise your back will suffer. Roll up your sleeves and make sure that you don't scratch your arms on the teeth as you concentrate. Get into a position where you can see the shiners and adjust the lighting. You might find that a headband magnifier helps.
Start on the teeth under the handle. These are the least used, so any mistakes made in getting settled into the job will be in the least harmful place.
With the tip of an index finger on top of the file, bed the file firmly into the gullet behind the first tooth pointing away from you with the file parallel to the guide lines. The front end will be pointing in the direction of the handle.
Memorise the angle the file's top face makes with the horizontal (about 14°). You will need to maintain this as you work. There is a good tip for maintaining this angle on the Vintage Saws website.
Some people work with the file horizontal, others prefer to work with an upwards slant of about 20°. By working obliquely across the narrow edges there should be less vibration and more efficient working. However, this means keeping your eye on three angles, so beginners might prefer to work with the file horizontal.
Transfer the index finger to the tip of the file. Pause to make sure that you have got it right, then file the back edge of the first tooth set away from you, at the same time the front edge of the adjacent tooth (set towards you) will get filed.
This is the way I was taught by the late 'Cramper Lewis' who wrote Spear & Jackson's saw maintenance booklet 'Concerning Handsaws'.
However, there is another school of thought that has the handle pointing towards the toe and the file working on the front edge of the tooth bending away from you and the back edge of the tooth pointing towards you. (SeeVintageSaws.com)
Apply pressure only on the forward stroke, but do not lift the file out of the gullet. Two or three strokes should be enough, but work until half the shiner is removed and you have created the condition illustrated just below.
Assuming that the half-shiners (right) are all the same size, this might now be the time to set the teeth. Most people use a plier type of saw set such as those made by Eclipse. Some people prefer to do it later.
Keep your eye on the angle guidelines and work the full length of the saw. Shift your body in pace with the movement along the saw, otherwise the filing angle will tend to drift.
Turn the saw round and apply the same procedure, the file still forward stroking towards the handle. File until there is just the tiniest sign of a twinkling on top of each tooth. Go no further! If you do, there will be no way of telling the effect you are having as you file.
Brush away the filings and examine the teeth critically for shiners still too large.
Rectify if need be.
Remove the saw from the chops and sight along the saw to see what sort of job you have done. The tops of the teeth should be in a straight line (or a slight convex curve if you want to have a 'breasted' saw).

For a more detailed primer from a very expert source -Saw Filing--A Beginner's Primer