Prepare the material with an extra 0.75mm to 1 mm (1/32in to 3/64in) cleaning up allowance in the thickness.
Plane the ends dead square.
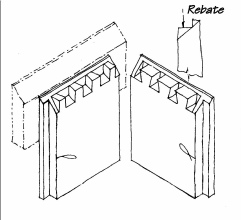
Rebate both ends to form the tops of the pins and tails.
Mark the mitres on the edges. Note the temporary flats deliberately left on the top edges of the mitres.
Mark the socket depths.
Mark and saw the pins at 45 deg to the face.
Finish the tail socket by chopping and paring. Lots of fiddling and faffing in corners. Skew-ended bevelled edge chisels are useful. Since end-grain adhesion is almost non-existent, you can undercut, but don't overdo it.
Scribe and likewise form the pin sockets on the mating piece.
Cut all edge mitres.
Use a guide block with a 45deg face to guide a shoulder plane when forming the long, narrow mitre faces.
Fully dry assemble to check the fit. Draw arrows on the inside showing which way they should separate. Don't waggle the parts to separate them. Use a hammer on a batten.
If the joint is too tight, plane a few shavings from the inside face of the pin bearer. If too slack, start again!
Glue up.
When cleaning up, plane down to the mitre junction. This way you have prevented damage to the sharp edge of the mitre during benchwork.
To visualise this joint think of it as a common dovetail joint overlaid with a series of thin panels.
Notes: A magnifier can be very useful when marking out the mitres. Use the end of a combination square to test both vertical faces and the floors of the sockets.