If you have ever driven a chisel deeply you will have observed an irresistible movement that takes the chisel off course. Here's an attempt to explain why it drifts.
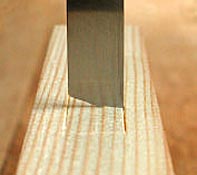
I used an elastic luggage cord to bind a 5/16in mortise chisel to a guide block having a vertical end. I held the chisel handle just firmly enough to prevent it being knocked sideways, and pounded with about thirty blows until it was fully embedded in a piece of fairly soft pine.
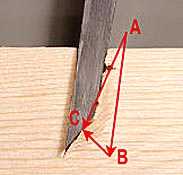
Triangle of Forces:If two forces acting at a point can be represented in magnitude and direction by two sides of a triangle, then the line closing the triangle will represent the 'resultant' of the forces. The red lines show such a pair of forces acting on the chisel. AB is a 'vector' parallel to the chisel axis, representing the driving force applied by the mallet. (I could have drawn a lot of little arrows parallel to BC to represent the 'reaction' that pushes against the bevel, but it is customary to represent them all by one arrow acting at the mid-point of the bevel). In closing the triangle, AC indicates the 'resultant' effect.
Workshop lore says that you can think of the driving force, instead of acting along the chisel’s centre line, actually acting along a line bisecting the bevel angle. I've therefore drawn AC parallel to this bisector. If this is the case, a bit of measuring suggests that BC would be about three tenths of AB.
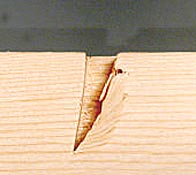
Right:You can see that the left-hand face of the cut did start vertically, but it curved leftwards as the chisel penetrated downwards.
Observe the deformation and compression of the fibres. The chisel went much deeper than you would ever expect to drive it (for one thing, it was difficult to extract). The action stopped when the fibres became so bent and compressed that they could resist the bevel's pressure. The chisel then became firmly wedged into place.
The point I'm illustrating is not entirely academic. One can feel this effect even when driving a chisel much less deeply into harder stuff. You might find that you have unintentionally undercut a joint..
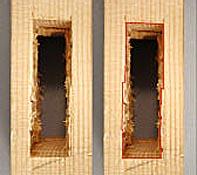
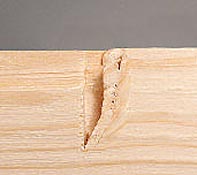
Left:The second cut showing that the wood chips have easily been forced backwards into the void behind the bevel.
Since little force was involved in shifting the chips, the reactive force (BC) was much diminished, hence the chisel was able to descend vertically, as intended.
If you have sometimes wondered just why, in spite of all your effort to plane everything perfectly true, a framed door still turns out twisted, it might be because you have managed to get your mortises in a twist. (Also see:Finish of Mortise Walls)
When hand mortising, you usually stand behind the chisel and while thumping, do your best to keep it vertical and between the mortise gauge lines.
No matter how hard you try to maintain good alignment, is possible that another irresistible force might send the chisel awry.
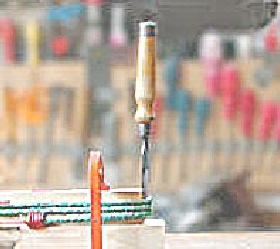
Right:For this demonstration I deliberately chose to chop a mortise with a obliquely-edged chisel.
I adopted the usual approach of starting from the mid point of the mortise, working towards one end, turning the chisel round and then working in the other direction. The effect of the sloping edge was to send the chisel sideways as it was driven downwards.
It moved to one side when moving towards the camera and to the other side when going the other way. The sad result is a twisted mortise.
Of course I did choose a chisel so out-of-square that nobody in their right mind would have used it to chop a mortise.