
When working by hand, tradesmen cabinetmakers will usually directly work with a mortise chisel. They start with a chop at the mortise's midpoint, lever out the chisel, move along the gauge lines and repeat until they get to one end. They then turn the chisel round and work towards the other end. (There are a few valid variations on this basic routine, seeChopping For A Level Mortise Floor.)
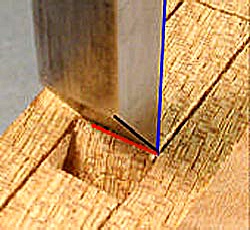
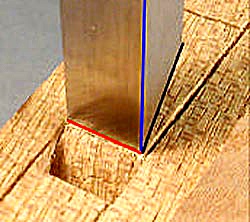
The Many-Edged Chisel:A mortise chisel actually has five cutting edges.The one you sharpen (outlined in red) first severs the fibres. .
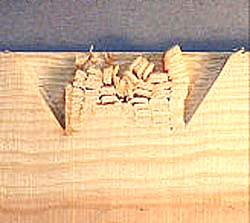
When the chisel is driven downwards, the bevel arrises (emphasised by the line a - b) will try to shear the severed fibres from those that remain bonded to the main body of the workpiece, scraping the mortise walls as they go downwards.
As the black edge (a-b) moved downwards into the wood, the action worked against the grain. (Note that on the opposite wall, the grain runs the ‘right’ way).
Some of the fibres chose the easy way out. Instead of being sheared, they split. The splits grew deeper into the workpiece side until something gave and the descending edge finally uprooted the fibres.
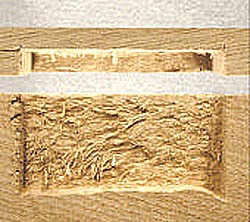
The right half of the mortise flank is somewhat better because the chisel, having re-started at the centre was working in the other direction so that this part of the mortise face was scraped with the grain.
The left half has torn fibres dangling loose, forming a very rough surface.
As the chisel was released (by levering backwards and forwards) the blue edge (b -c) sheared the wall’s fibres, although it could not do much good to the rough faces.
It occurs to me that because the roughness is greatest at opposite corners, such a defect could possibly explain why some joints can become twisted.
(The upper part of the photo looks directly down into the mortise).
Well-Intentioned Design?
Some mortise chisels are made with an exactly rectangular cross-section, whereas others (offered as better quality?) have a cross section like the chisel shown diagrammatically below.
The idea behind the tapered flanks is to make the embedded chisel easier to release. Workers who own such a chisel might consider that in the light of the following, there could be a right and a wrong way to use this pattern.
Chisel oriented as shown on the right:
As the chisel moves downwards, the chips move towards R.
The chisel flank, QT burnishes the fibres, instead of cutting them. In this orientation, the sloping flank can, in theory at least, be a bit of a disadvantage.
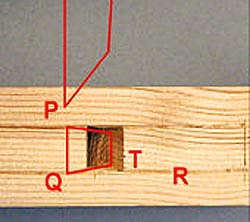
Where the bevel faces away from the void,the entire chisel moves downwards and forwards towards the void.
Here it is the blue arrises that do the scraping. QT is now a ‘relieved’ surface so the arris at ‘Q’ (the blue line) should offer a better scraping action.
Does All This Really Matter?
We want to get the best from our tools, yet it is worth bearing in mind that we are unlikely, by this technique, ever to produce perfectly smooth surfaces.
In spite of a common workshop myth, good adhesion does require smooth surfaces, so lets not kid ourselves that these relatively rough surfaces are a good thing.
Consider also that the mortise mates with a tenon whose flanks are likely to bear saw marks. It seems evident to me that mortise and tenon joints usually survive because the available gluing area is probably greater than they really need.
In the chisel away-from-void position,the chisel cuts more cleanly, but the mortise ends have to be squared up.
For a compromise approach, see:Chopping For A Level Mortise Floor.
A Few Thoughts
Even for well-fitting joints, use a gap-filling glue.
For difficult situations, maybe a drilled and pared mortise would, though very tedious and fiddly, be better? This way, you might be able to form walls with smoother sides.