
As far a mechanical strength is concerned, a mortise need not be much deeper than five times the thickness of the tenon. This can often mean that the tenon need not pass right through say, a door stile, but resides in a ‘blind’ mortise. Here’s a look at mortising technique with a view to efficiently forming mortise floors that are level and at the right depth.
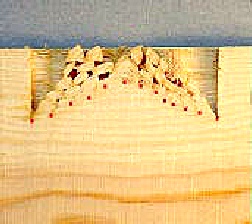
Start at the mid-point of a path marked by a pair of gauged lines. Taking care to hold the chisel vertical, pound away until it jams and will not go any further. Lever the chisel towards yourself before you pull it out. (Mind your chin!)
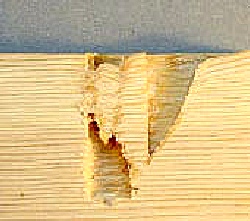
The result is this vee-shaped void; the starting point of all (but one, see below) hand-mortising rituals.
The next step moves the chisel along the path ready to start again. But there is an interesting choice. Which way should you step?

If you move rightwards to position ‘A’, (above) the cutting edge first severs the fibres. The bevel pushes them into the void, splitting them from the surrounding wood as it moves. Once it goes below the level of the first cut, the chisel jams again.
Each time it steps along the path it can go a bit deeper.
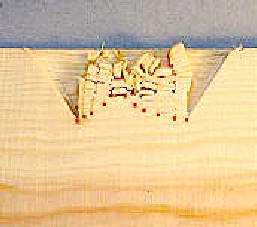
When you get within, say, half a chisel’s width from the end, turn round and start again from the centre. The outcome is this humped mortise floor. (For clarity, I’ve dotted the actual ends of the cuts)
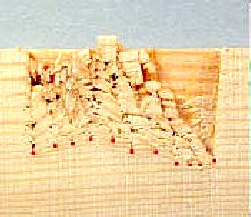
For this pic, the chisel started at ‘B’. Instead of going directly downwards, the chisel now rides down the bevel with the entire chisel moving forwards and downwards.
Take care! If the cutting edge is not aligned at right-angles to the mortise sides, the chisel will be driven somewhat sideways as well as forwards. The long arrises of the backface will shear the wood to form the mortise flanks.
The chisel now cuts more sweetly. The chips are stacked vertically but, after following the same routine, we still have a humped mortise floor. Another snag is that you finish with sloping mortise ends that that you have to chop square.
To avoid this situation, you can compound the two styles whereby you re-start at ‘B’, but this time having the bevel facing the void. When the chisel stops again, you turn the bevel away from the void, and then work from the ‘B’ position at the top of the slope, and so on. The pic shows a deeper mortise made in one pass and with a less-humped floor, but one still needing some fiddling to make level.
Using a Hole:Start by drilling just one mortise-width/tenon-depth hole very near the mortise end. Here the hole is on the left of the pic.
Its purpose is to replace the usual shallow vee-shaped starter void by a larger and deeper space.
Since the chisel can now penetrate the full depth, use a spirit pen (better than tape) to mark this depth on the chisel shank.
However…see below!
Which Style to Adopt?Note please, that apart from the final demo, the chisel was driven as far as it wanted to go, thus indicating the depths achievable with the first ‘run’ of the chisel.
Whatever is to happen next, and whatever variations you prefer, you usually have to mess about to lever out the waste before you can chop deeper or just level the mortise floor. This involves using the mortise ends as pivots, thereby rounding their corners. (Hence the advice to stop short of the mortise ends).
You might join me in disliking this mining away in the dark, so let’s look at another strategy that can make a deeper mortise in one pass and form a better floor at the same time.
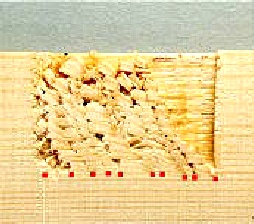
You need to be careful about the bevel orientation. When the bevel faces the hole, it forces the chips downwards into the bottom of the hole. You should find that at each pass, the chisel would descend to the marked depth.
If, however, you start with the bevel facing away from the hole, the chips are driven leftwards, but not downwards. The photo shows how this action can firmly jam the first few chips against the side of the hole so the chisel jams before it can reach the full intended depth.
By the Way…
Make sure that there is room for the glue between the tenon end and mortise floor, otherwise ‘gluedraulic’ pressure might prevent the joint from closing.
And if you are wondering how these sections were made, think superglue!