
A commentary on a method of mortising described by J Maynard in Woodworker magazine July 1964
The photos below represent the result of several trials each showing the blocked hole that prevented the chisel penetrating further.
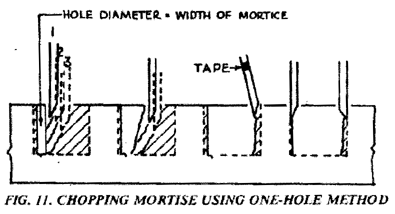
The photo shows three more of less equally spaced cuts using an 8mm (5/16in) hole as the starting place for a 5/16in registered pattern mortise chisel. These illustrate the early stages of chopping according to the scheme shown above.
In each case, the first cut started about 5mm from the perimeter of the hole. The second and third cuts were made at 5mm intervals from the first.
The chisel was struck until it had gone as far as it could without applying excessive extra force.

For the left hand side of the photo, the chisel was oriented as illustrated, ie with the bevel facing away from the hole.
In this configuration, the bevel drives the chisel bodily to the left, producing a stack of chips guided by the chisel's backface.
For the first cut the chisel drove forwards until it shot forwards and stopped with the hole visible at the bottom of the void created by the chisel. The chips visible against the left-hand wall of the hole were formed by the semi-circular section of wood that was displaced.
The second cut progressed until its chips (the wider band) were pressed against the wall of the hole whereon the chisel was more or less jammed in place.
The chisel was then advanced by a similar amount (about 5mm or 13/64"), but it is evident that the advantage of the hole had been lost. The chips were slightly displaced to the left during the extraction of the chisel.
On the right hand side of the photo, the chisel had its bevel facing the hole.
In this configuration, the chisel drives more of less vertically downwards. The improvement seems to be that the chips are gradually driven downwards by the bevel.
The chisel penetrated to the full depth of the hole without any undue resistance.
The two subsequent cuts progressed without difficulty, increasing their penetration with subsequent cuts.
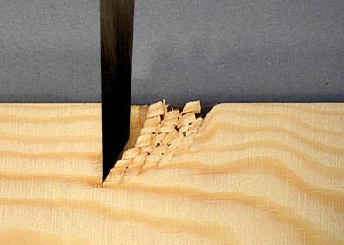
Shown on the left is the progression of a chisel as it works along a mortise, starting as many workers are taught, at the centre of the mortise.
As the chisel penetrates, the edge severs the fibres and in this case the backface shears and then compresses the wood until the resistance eventually causes the chisel to jam in place. Note the distortion of the compressed wood fibres on the right-hand side of the photo.
During the first stage of the next cut, the fibres are easily sheared into the void until it is filled with chips. The chisel then starts to work harder until the compressed chips offer resistance to the backface. Eventually it becomes jammed and ceases to cut.
Note that there is a space behind the chisel. This was created when, as usual, the chisel was levered backwards prior to its release from the mortise void.
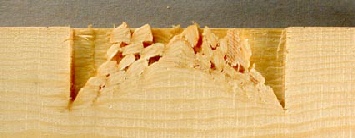
Right:The profile of a mortise chopped by continuing the process shown on the left. Evidently, one has to lever out the chips and then start again at the centre. A rather fiddly job. It is easier to get a level mortise floor when using the hole-first technique . Indeed you would need to observe a depth mark on the chisel if you are not to go further than intended.

Left:The article showed an alternative to the above. Start at the centre with the bevel facing the mortise ends. Start at the centre and, Make one stab cut and, turning the chisel round each time, chop until a vee-shaped void is cut to the required depth. (More gradually than the drawing suggests). Excavate the waste from the void as you work. Then apply the above bevel-centre-facing approach, starting part way down the sides of the vee.
However, you do have the job of first accurately drilling the hole.
However, for more information and pics about both these approaches, please look at:Chopping For A Level Mortise Floor
Tip:It is more satisfying to mark the chisel with ink from a felt pen (or engineer's blue) than to use tape that soon becomes damaged as the chisel is levered out of the mortise.
In case you were wondering how the pics were made, think super-thin, super-glue.