

Assuming that you are going to join several boards to make a wide panel, identify which joint is which by marking the partners with various combinations of single or multiple strokes across the joint. Some people draw one big triangle right across the assembly.
It is really desirable to work with material that is thicker than the intended finished dimension. The entire surface can then be planed after the job has been glued. However, many people will need to work with pre-planed material that might or might not be as flat as it was when it left the sawmill's thicknesser.
For long joints, the longer the plane the better, providing the sole of the plane really is dead straight. Speaking from experience of an older, well used cast-iron plane, this is not necessarily so. If you have one, a wooden try plane has the advantage that it can easily be checked and remedied if necessary. They also ride better on a shooting board.
For the sake of the sole of your plane, and its cutting edge, check for embedded grit anywhere in the boards, but especially in the ends where they might have been stood on all manner of dirty surfaces.
The plane should be very sharp. For one thing, a bluntish edge will tend to ride over harder parts of the grain and for another, a burnished surface caused by blunt tools takes glue less efficiently.
A small curvature to the edge profile is essential. This causes the blade to cut a thicker shaving at the centre of the sole so that the angle of the edge can be controlled by offsetting the plane's centre lineHow To Plane A Square Edge.
Strictly speaking, a 'rubbed joint' is a panel joint made with a hot adhesive (usually 'Scotch' glue, an animal glue) that gives an almost instant grip. The joints are shot without any concavity and require no cramping. However 'Joiner's dogs' can be driven into the end-grain of the panels. Inspection of such joints in some older work reveals a tendency for the joints to open at their ends.
If there is wild grain that offers near-end-grain adjacent to the joint, it might be advisable to strengthen with a tongue or biscuit. (There is virtually no strength in end-grain glue bonds). For normal grain structures, the glue bond between the joints will be stronger than the internal bonding within the wood fibres. Consequently, reinforcement will be unnecessary.
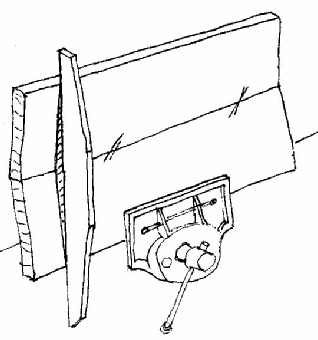
Grip one piece in the vice. You will need to support the other end of a long piece.
Start by planing short strokes at mid-length until the plane will not cut any more. Gradually lengthen the strokes until the plane just cuts from end-to-end. If the job is a long one, ensure a continuous cut by walking with the plane, maintaining a constant pressure as you move. The action is one of trying to scoop a hollow edge, but the straight sole should prevent this.
To stop the plane drifting sideways, it helps to grip the front end with your finger tips acting as a fence against the wood. Trying planes have a proportionally longer toe to help you make a good start.
Plane the mating part in the same way.
Offer the two parts against each other. Check with a straight edge to ensure that the faces are in alignment.
If not, rectify by planing one or other edge.
Do not attempt to change the edge angle by tilting the plane, but move the plane's centre line to the high side.
At this stage it may pay to touch up the blade, especially if the wood is at all hard, is abrasive or difficult because of wild grain. Set the blade to produce a tissue-paper shaving. SeeHow To Plane A Square Edge.
Once alignment is OK, mount the boards together and by using fingers and thumbs swivel the ends of the top board a small distance. If the joint is rounded it will swivel easily. If hollow, you should get a nice gritty feel.
Continue planing and checking until you have a very slightly hollow joint. This slight hollow can compensate for the tendency of the ends of boards to shrink more than the body.
Examine the joint at mid-length to check the size of the gap. Depending on the boards in question, the thickness of a credit card might be the limit for a 5' joint, whereas the thickness of the cover of a magazine cover would be the maximum for a 2' long joint.
Check both ends for contact at each of the four potential contact points and confirm by gently trying to wobble the top part on its foundation. If it does wobble, one or both surfaces must be in twist.
Rectify by deliberately drifting the plane off-centre, moving towards (or away from) the high side as it progresses forwards.
Do not forget to re-check for alignment. Getting a straight edge and the faces in alignment at the same time is what sometimes makes even a woodworker swear.
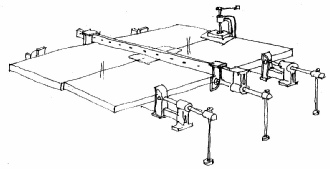
Finally, cramp and glue as indicated. Use pads of polythene sheet to prevent reaction between the glue and the cramps.
If surface alignment is a problem, nip the centre first and manoeuvre each end into line and cramp.
If working with ready planed material don't wash away the squeezout, it will interfere with polishing.

Some people like to grip both pieces in the vice and plane the two edges at the same time. Providing the boards are be arranged so that the show faces are either on the outside, or face each other on the inside of the pair, the alignment of the faces should be automatic, whatever the angle of the edges to the faces. Although many woodworkers have successfully used this technique over a lifetime, improvers should be aware that there can be a few mild reservations about this technique.
A Versatile Shooting Boardcan overcome the alignment problem, especially with thin boards. Novices might find them difficult to use at first, and they do become more difficult to use as the joint becomes longer and the wood is thicker or harder. It is worth persevering.
