
Please note:This is intended to be a technique ,for the average worker with limited facilities. I'm afraid that scraper perfectionists will need to look elsewhere.
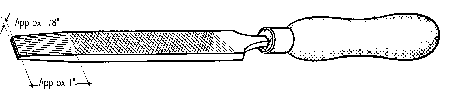
The drawing shows how the last inch or so of an old 6 inch (150mm) file has the teeth ground away to form a smooth surface. The profile of the end is ground slightly curved across the width, but flat across the thickness to form two sharp edges. The edge should be about 1/8" thick.
Rest the surface of the file on the face of the wheel and stroke it forwards and backwards. Frequently dip in cold water to avoid spoiling the temper by overheating.
One way to sharpen a scraper is to hold it vertically and rub pendulum-fashion against an oilstone. This need not be a very fine stone, but this job will not improve your best stone, so use an old one if you can. If you have something like a medium grit flat scythestone, it should serve very well.
Failing this, tip your good stone on edge and work on the edges.
A second method uses a diamond hone.
Regular sharpening is the key to success, in fact scraping with a sharp scraper can be quite satisfying.
To check the fit between a surface and a surface plate, engineers have traditionally used a greasy agent they call marking blue (not to be confused with engineer's marking-out paint, which is also blue).
At the time of writing - Tilgear's catalogue, page 23, Stuarts Micrometer Engineers Marking, £1.25 tin.
Alternatively, use traditional Prussian Blue oil paint from suppliers of artists materials. The colour does not really matter so long as the pigment is not abrasive and is easily visible.
Protect the bench top. Graphite dust is released. It can get everywhere, making a mucky mess.
In the UK, engineer's cast-iron surface plates can start at over £100 for the lowest grade, but modern plate glass should be adequate for our purposes. A piece of 6mm plate 12" x 10" might cost £5 or so, unless you have contacts for offcuts.
Make the edges safe by removing sharp edges with an oilstone or diamond slip lubricated with paraffin. Select a flat piece of thick chipboard or MDF sheet. Retain the glass with a few sprigs tapped around its perimeter into the supporting surface. Prepare the surface for a thin coat of engineer's blue by grinding with abrasive grains and the bottom of a jam jar, but retain enough unfrosted areas to indicate that the surface is still flat.
You can get some grains by soaking aluminium oxide paper in hot water and rinsing off the glue from the grains after they have been scraped loose. Papers sold as flexible usually use a water-souble glue.
Some kind of applicator will be needed for the blue. Inside the bottom end of an old plastic spice/herb container, coil a strip of hard felt from an hat. I've been told that some advanced metalheads use elaborate rituals with their finger ends, but this was good enough for me.
To prime the applicator, dampen the felt with white spirit (substitute turps), but do not make it too wet. Spread some paint directly onto its surface. After it has been rubbed-in, squeeze a quarter of an inch or so of paint onto a smooth, washable surface such as a melamine offcut, add one or two drops of white spirit. Spread with a stick. Re-charge the applicator from the plastic surface. Keep the applicator in a sealed jar when out of use for a while.
Spread a thin, not too wet, not too greasy layer of blue onto the glass surface plate. If it is too wet, you will get an optimistic reading. Use a straight up-and-down motion without overlapping the strokes. We are dealing with minute amounts and do not want to be misled by thickly built-up areas of blue.
Clean the surface plate when the film of blue starts to harden and pull away. Applying the blue is probably the trickiest part of the job. The rest is just a test of character.
Blue-up the sole by rubbing the plane over the inked surface. The blue shows the high spots that need to be ground or scraped away. Look closely at the centre of the blued area and you might be able to observe the area of metal actually burnished by contact with the surface plate.
As the accuracy of fit improves, watch for suction. A directly upwards movement can lift the plate, and its mount, especially if it is a bit wet. Slide the plane from the surface instead.
Please note that the glass can become fragile, maybe owing to the numerous scratches acting the same way that diamond glass cutters do.