
Turn it upside down in the vice with the blade in position but drawn slightly back of course. Have the wedge at your usual tightness. Over tightening can make a plane concave from toe to heel.
With a very sharp blade and a fine set, start planing somewhat forward of the central area until the plane will not cut any more. Extend the length of stroke until you can cut from end to end.
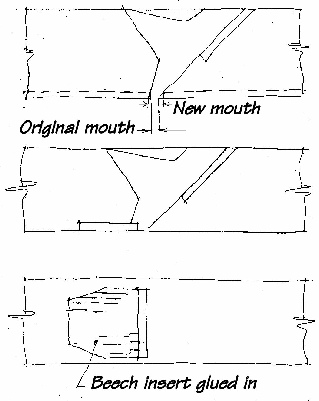
Unfortunately, the design of the plane's escapement is such that as the diagram shows, as you plane the sole the mouth opens. Once the worn areas are removed replace the iron and check the size of the mouth.
If you make the new front lip square to the sole, the mouth will not open as the inlay is planed. This means that you can position it to give an ultra-fine shaving aperture if that is what you want. Otherwise make it 0.5mm (20thou) or so.
You might find that before going any further you need to re-mouth the plane by inlaying a piece of similar material. Some people inlay harder stuff, but since we want the plane to wear evenly and keep the sole straight from heel to toe, but I'm not sure that this is quite as good an idea as one might at first think.
When the inset has been glued and is set, plane until the sole is straight from end-to-end, and flat crosswise of course, check for twist with winding rods (or with a spirit level). SeeCoping With Twistfor a description of a twisted surface and its configuration as you plane diagonally to flatten it. Hopefully an understanding of what is happening should enable you to correct the twist without losing too much of the sole.
Note that tightening the wedge tends to make the plane concave lengthwise.
Avoid sandpaper since this might transfer embedded grit to your workpieces.