I designed this for recreational craftsmen (and craftswomen) who came to woodwork evening class more than thirty years ago. Time being at a premium, we dispensed with a separate box-plinth and used a traditional construction which incorporates an apron below the bottom shelf. It offers the experience of making through dovetail joints and twin mortise and tenon joints incorporating a housing. The sizes given are those that suited the maker of this particular example. You can make their own adjustments of course, bearing in mind the need to maintain good proportions between the height and the breadth.
Work out the overall height from the sizes of books to be accommodated. If the breadth is to be increased, it would be wise to make the loose shelves from 7/8" boards rather than the 3/4" used for the carcase. This makes some allowance for the increased deflection that will be caused by the weight of the increased number of books. Disguise the increase in thickness by planing a wide chamfer on the undersides of of the front edges of the shelves, thereby making the edge appear to be 3/4" thick. Remember to take this into account when spacing the shelf supports.
If you alter the shaping of the apron, allow sufficient room for cleaning tools to operate, and choose shapes which do not introduce short grain.
A Strategy for the Dovetail Joint
It is common for dovetails to be cut on boards having a small amount of wasteleft on their ends, a method which can be time and labour saving. It copes with a degree of rough handling, and has advantages for the tyro in that that any rounding of pin and socket top arrises is removed when the waste is cleaned off. This rounding is usually be caused by rather tentative sawing when starting a cut.
There are snags, however. Until the unit is glued up, the waste projects above the surfaces of the boards at just the very places where cramping pressure should be applied. To move the cramping battens inboard will be unsatisfactory, since the cramping forces will cause the carcase members to curve inwards. Specially tailored, notched cramping blocks therefore have to be made, thereby laboriously overcoming one problem yet introducing a complication at a time when, in spite of the luxury of modern adhesives, speed, simplicity and above all calm, are still essential.
The projecting waste also causes complications when cleaning up. If accidental splitting is to be avoided, the end grain needs to be cleaned away with considerable care, there being no possibility of using a smoothing plane in such a way that each projection is individually treated. To be on the safe side, some people therefore wisely commit themselves to the tedium of chiseling off the corners of all projections, thereby ensuring that there will be no unsupported end-grain to be caught by the blade of the plane. This is virtually essential if there are more voids between say, pins and sockets than you intended!
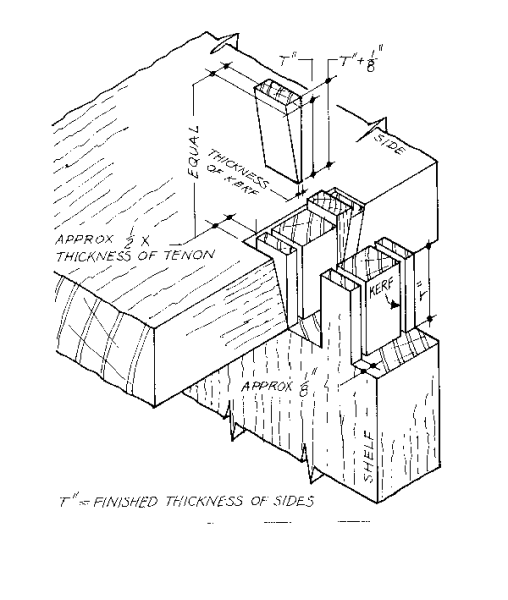
The end-result of an alternative technique is illustrated in your dovetail printout. Here the boards have been finished slightly full in thickness, but the ends are finished square and dead to length. The depths of the pins and sockets are marked out to the exact final thickness, gauging right across both faces of the board. As the drawing shows, the ends of pins, tops of tails and ends of tenons of the assembled job are slightly recessed until the job is cleaned up.
Cramping is simplified, and once the glue has set, the outside surfaces are simply cleaned down until the plane just touches the ends of the boards. Note the added advantage that during the final skimming of the outer surfaces, the traces of the gauge lines will be removed, always providing they were not cut too deep.
Getting Down to Work
First and foremost, ensure that your boards have dead flat (ie not cupped) face sides.
There is no need for complex combinations of pencil and knifed lines on the outer surfaces of the carcase which the simpler technique requires. Incidentally, I belong to the brigade who never use a cutting gauge, but for all purposes use one or the other of a pair of standard marking gauges, one having the right hand half of the cone of the point filed away, and the other the left hand half filed to form sharp, reliable cutting edges which cut equally well across the grain as with the grain. If you have sufficient confidence in the ability to saw to a line without hesitation, you will find that this method has considerable advantages. In any event, the more hesitant woodworker would profit from making a practise joint beforehand. Make sure you use the same wood.
- If prepared timber has been purchased, remove the planer marks by lightly skimming to prepare the face sides. They should be on the inside of the carcase.
- Because rebates are to be cut, arrange for the face edges to be at the back.
- Mark out the dovetail joints, bearing in mind their decorative function when determining the proportions of the pins. Most people think that fairly slender pins look the best.
- I assume that you are familiar with the practical details of actually cutting the joints or have access to printed or live guidance, but a couple of tips may be of some value. At the stage of striking the pins from the tails (or vice-versa if you prefer it), flatness of the datum faces is absolutely essential. Should there be, in spite of all precautions, some residual cupping, cramp a stout, slightly curved batten against the convex face of the offending component and tune the pressure to restore the true surface. Note that if the joints are to be assembled without unwanted stress, this correction will also need to be applied and maintained until the adhesive has developed its full strength.
- Cut the joints, leaving the cogged section of the top until the rebates have been cut.
There's more information about dovetailing at:Dovetailing Detailed.
The Base Joints
The two pairs of twin mortises incorporate a housing to restrain any tendency of the shelf to cup in use. Also they help to cover any slight gap that might be induced by future shrinkage of the sides. All the same, it is worth arranging this board so that if the unrestrained section between the two ends were to cup a little over the course of time, the upper face will become concave. This will afford steadier support for books and other items.
While it is normally absolutely essential to mark out only from one of the two datum faces, (the face side or face edge), a departure from normal practice is needed for this kind of job since a standard mortise gauge will not reach across the full width of the boards. Although the drawing shows that the base is finished slightly narrower than the sides, prepare it in the first instance, to the same width as the sides, checking that at each end the widths match exactly. It will then be possible to gauge from the face and then the opposite edge of the boards and thereby set out the joints so that when cut, the members will accurately interlock. After joint cutting, the base is simply planed narrower until it aligns with the rebate. The wedged tenons are shown in some detail. They can be a boon to the person who is short of cramps, but in the making thereof, attention to detail is needed if they are to be really satisfactory, hence the detailed drawing.
Single or diagonal wedges are, in the writer's opinion, unreliable for this purpose because they are unable to effectively spread the tenons into the dovetail formation needed to hold the assembly while the adhesive sets (unless you get up to one or two crafty dodges). For maximum strength, the sawing of the wedges, and the splaying of the mortises should be performed with the accuracy suggested in the drawing.
Fitting the Back
Those with access to a high-speed router will be able to form a through rebate on the top and a stopped rebate on the sides, finishing in a position which allows the bottom edge of the back panel to align with the underside of the base. Where the rebate needs to be planed or sawn however, a through rebate is economical in time and labour but such a rebate leaves an unfilled section, the spur of which is vulnerable to an accidental clout from a careless foot. This section should be refilled with a matching slip of wood carefully glued into place.
The Apron
- Prepare the 1/4" x 1/4" grooves on the inside front edges of the carcase below the base and assemble the main carcase.
- Make any adjustments needed to ensure well fitting joints and determine the exact inside dimension of the carcase. Transfer this measurement to the apron and mark out and cut the tongues.
- Drill four 1/4" holes for the dowels on the underside of the base. Invert the carcase, fit dowel points into these holes and slide the apron into place in order to mark the centres for the corresponding holes.
- Fit the dowels along the top edge of the apron so that they project 1/4". Create a small chamfer around the top circumference of each dowel to assist location. Remove, drill holes 1/4" diam by 5/16" deep into the underside of the base and refit to check the fit.
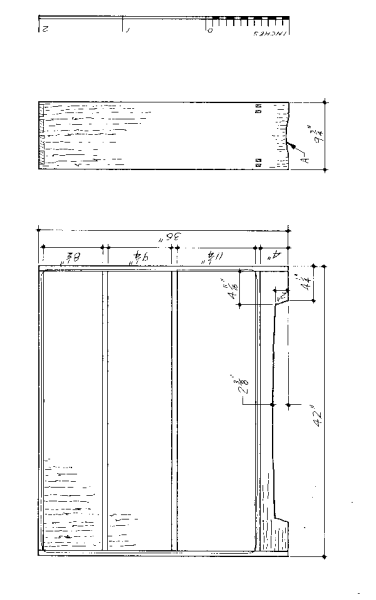
- To mark out the long curve forming the top of the shaped aperture, obtain the help of an assistant who can pencil against a spline bent to form a curve similar to that shown in figure 1. A better curve is obtained if the spline is somewhat thicker in the middle. If working single handed, use a tourniquet with a loop of string to make the spline into a bow shape.
- For marking the vertical curves, the trouble of making a template will be well rewarded because the lines can then be knifed on both the front and back faces, thereby avoiding problems of rag likely to be created when sawing across the grain. A scrap of melamine sheet (Formica etc.) will serve as an easily made template. While a variety of tools will serve for cutting the opening, a bandsaw or sabre saw (often called a jig saw) are possibly the most suitable.
Final Touches
- Make or purchase four sets of shelf supports, making sure that they will be strong enough to support the shear load imposed by a full shelf of books. If fitting your own pegs, make a positive depth stop by drilling down the axis of a dowel of the right length, and drill four groups of holes to receive the shelf support bushes. A machine pattern wood drill is best; if a traditional woodworkers brace and bit are used, check that the screw point will not penetrate the side.
- To better enable the bookcase to firmly stand on an uneven floor, saw and spokeshave a shallow hollow on the lower end of each side as at "A" in figure 1, and also work a very flat chamfer (about 1/8" wide by 1/32" deep) on the flat sections of this surface in order to prevent splitting in the event of the unit being dragged across a rough surface, an action not very dissimilar in its likely consequences from attempting to plane straight across end grain with a blunt, coarsely set plane.
- Using only a pencil, (never mark chamfers with a gauge), mark out and work a small, stopped chamfer on each of the front edges as also indicated in the front elevation. Without touching the chamfers, whose flat surfaces and arrises are very easily dubbed round, and which must therefore be left straight from the chisel and plane or spokeshave, glasspaper and lacquer the insides of the carcase with a clear lacquer or polish with beeswax. Since woodworm is reputed to prefer to lay its eggs on unpolished surfaces, it is a good idea to apply some polish to the unseen surfaces, but not, of course, to those that are to receive adhesive.
Completion
- Glue and cramp the base joints, not forgetting to glue the wedges, which should be bone-dry. Take care to equally drive both wedges of each tenon (otherwise you may find one wedge kerf very firmly and irrevocably closed). Once wedged, the cramps can be removed.
- If opting for the dovetailing technique described above, resist the temptation to dispense with plain cramping battens across the tails. To do so would be to invite a split board, especially if the joints are at all tight. Make the battens from material about 1-7/8 " x 3/4", and cramp with the narrow edge against the carcase.
- Check for squareness by comparing the diagonals using a pencil and a thin lath, and remedy, if necessary by slightly slewing the sash cramps off the centre lines of the sides. I have seen quite a few otherwise good jobs marred during the apparently simple operation of removing the adhesive squeezout. It is important the there be a film of some kind between the exuded adhesive and the surface of the wood, otherwise, of course, some of the adhesive will bond to the wood. Where wax is to be the finish, the adhesive should be left to harden until it reaches a cheese-like consistency when it can be lifted away by inserting an exceedingly sharp and fairly wide chisel, bevel side downwards, between the adhesive and the wood and gently lowering the chisel handle. If, however, the inside surfaces have been treated with a water resistant lacquer, wash exuded adhesive from the inside corners and from the outside of the carcase. (The washing-off water is will have a magical effect on the quality of your joints).
- Take care that water is not allowed to remain between the cramps and the oak, otherwise a blue stain will appear. If this should happen, these stains (and the stains caused by the perspiration involved in the normal handling of oak) can be removed by swabbing with a concentrated solution of oxalic acid crystals. Neutralise the effect of the acid with a borax solution. If oxalic acid has been used, allow at least two full days for drying before polishing or lacquering to ensure that there is no dampness lingering in the depths of the vessels of the wood.
- Note that Oxalic Acid is a poison with irreversible effects. Although it is not in the cyanide class, it is prudent to only make up sufficient solution for each job and immediately discard any surplus. The crystals should be stored in a secure place, well away from children, in a clearly labelled container. Commonsense suggests that one should never make up any kind of workshop preparation in anything which resembles a drinking vessel, and never of course, drink from improvised vessels.
- Trim the back panel to size, polish or lacquer and screw into place.
- Trim the loose shelves to length, clean up and polish or lacquer.