Since small sawbenches can be used for precision dimensioning on small workpieces, hands can be very near to the blade.
Ask the principal question 'What will happen if it jumps?'. If work is kicked out of the hand, the hand continues to move in its original direction, invariably in the direction of the blade. The safe situation is to have the hand so located that in the event of an involuntary movement, it cannot hit the blade. For this reason, any pushstick should be at least 300mm (12in) long.
When feeding long pieces the left hand should not be allowed to remain in the same position on the side of the timber throughout. If it travels with the timber, it might pass by the cutting teeth.
Take care when feeding thin material. The hand can easily slip off the leading edge and travel onto the blade.
Unless the saw is designed to accommodate large panels, eg of manufactured boards, cut the panel to an approximate size prior to dimensioning on the sawbench.
Beware of splinters.
Apologies to all left handers!
The left hand is often used, to assist in feeding at the start of the cut and to steady the timber as the sawyer takes hold of the push stick to feed the last part through. This hand should never be closer than necessary to the front of the saw teeth. When the push stick is in control, this hand should be placed where a jerk or kickback will not lead to the hand meeting the teeth.
Feeding Drill
Check the material for splits that might become loose wedges, loose knots, grit, nails and be aware of the possibility of ingrown metal.
Ripping long lengths
For fear of a kickback some people take the precaution of standing out of the line of fire. When appropriate this does often make sense. It can be important however, especially when handling heavy stuff, that the sawyer should be in the best position to handle and feed the material.
Ensure that the push stick is within reach of the right hand
Check that the taking off table (or roller) is in position.
Check the floor for anything that might cause a stumble if you have to walk forwards.
Stand with the left foot forwards.
If the board is cupped (ie curved across its width), offer the work with the cupped side downwards.
If the board is slightly bowed (curved lengthwise), to avoid chattering, offer the work with the convex face downwards aiming to have contact with the table in the region of the cutting teeth. Use a bandsaw for deliberately bowed workpieces.
If the board is sprung (curved sideways), see below underFreehand Ripping
Support the material with the right hand.
Settle the work so that the lower face is flat on the table
Offer the leading edge near the blade, applying sideways pressure towards the fence with the left hand. Steer with the right hand until the workpiece edge is aligned with the face of the fence.
Feed the wood forwards until the trailing edge is about 300mm (12in) from the blade. Use the best feed rate that will not unduly slow the saw.
Align the push stick so that it is just to the right of the plane of the saw. Push until the wood has cleared the cutting teeth.
Using the stick to push fencewise and forwards, separate the two parts by moving the right-hand part of the board sideways and forwards. This prevents unnecessary contact with the rear teeth for the last 250mm (10in) or so of the cut. (This will only be possible if using a short fence, seeFences).
To clear it from contact with the sides of the teeth, separate the near end of the offcut with a leftwards push.
If the offcut is to be re-cut to form another dimensioned piece, remove the first piece from the taking-off table sufficiently to allow space for the next piece. Withdraw the offcut, taking care to avoid the blade.
Short workpieces
The push stick and a push block (or two push sticks) may be needed.
Alternatively shop-made feather boards or manufactured devices can be used to ensure adequate pressure, though the hassle of setting them up might deter the user, especially if only a few cuts are to be made.
The shorter the job, the greater the risk.
If the length of the cut is not greater than the diameter of the saw blade, cross-cutting practice should be applied, ie the sliding fence must be used. Otherwise there is a great risk of the workpiece jamming between the fence and blade and consequent severe kickback. SeeFences.
Slender workpieces
With the guard in place, there can be insufficient space for the push stick to operate. The auxiliary wooden short fence shown in the diagram will usually enable the pushstick to contact the near end of the wood. The fences fitted on some sawbenches can be turned on their sides so that a narrow edge faces the saw.
Freehand Ripping
If the stuff has irregular (eg waney) edges, there can be a temptation to try to produce a straight edge by sawing to a marked line. Control of the cut implies that the board will have to be steered slightly sideways (slewed) as well as forwards.
When the job is moved sideways, one side or other of the kerf will try to bear against the uprunning teeth of the saw. Without the protection of the riving knife the work can be violently kicked towards the worker.
Even with a fitted riving knife, the risk is greatest until the leading edge of the workpiece reaches the edge of the knife.
The safe solution is to firmly mount a straight lath (using double-sided tape or nails into the sapwood) to the upper surface of the workpiece. The lath then runs against the fence.
Precision sawing to a mark
For people who generally use only one multi-purpose blade, a very useful dodge can be to indent the table top near its front edge with at least one pair of marks, one in line with each side of the teeth. The right-hand mark serves to indicate the line of a rip cut while the other indicates an alignment for a cross cut. It is then a fairly simple matter to align the rip cut mark on the board with the right-hand indent, bring the fence up to the right-hand edge of the workpiece and make the final micro-adjustment. Keep the marks as far as convenient from the blade so that when sighting the face is not immediately over the blade. For a diagram, see 'A Useful Tip' inCrown Guards.
Likewise a piece intended to cross cutting can be lined up with the left-hand mark before being fed forwards using the sliding fence.
Cross Cutting
Use the sliding fence (mitre fence, cross fence).
When making oblique cuts, bear in mind that the cutting action will tend to draw the workpiece out of proper contact with the fence. A cramp might be desirable.
SeeFencesabout the risks of using the ripping fence as a length stop for repetitive cross cutting.
Watch that offcuts do not drift against the uprunning teeth and perhaps become ejected.
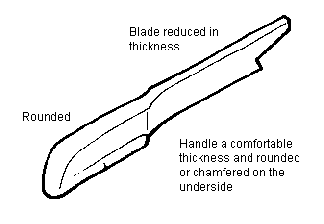
Push sticks
The length should be at least 300mm (12in).Make the inside angle of the beak about 85°.The inclination of the upper surface of the beak will depend on the height of the user.
Use straight-grained wood that will not break under the loads applied. People will have their own ideas, but this is a version of the traditional pattern.
Avoid plastic pushsticks that can shatter and create sharp broken edges that cut the user's palm.
Avoid using any old offcut as a push stick. Take trouble to make a good quality well-designed stick that you will operate effectively. This should ensure that it is clearly recognisable as a tool and not just a stick to be cleared away with the rest of the offcuts.
So that the stick can always be hung in the same convenient place, some people provide a hole in the handle for loop of twine. However, I've found that the loop tends to dangle and can get caught in things.
There will be times when it is desirable to use a push stick in each hand. See the push block drawings, however.
Use the push stick to feed material between the saw blade and the fence throughout any cut shorter than 300mm (12in).
Use the push stick on the last 300mm of any cut.
Use it to remove offcuts from between the saw blade and the fence.
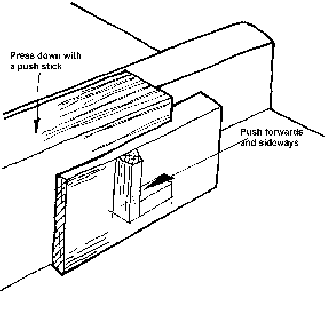
Push blocks
A useful accessory when handling short stock. It enables the face side of the workpiece to align with the face of the fence without bringing the fingers near to the saw.Make a similar block, but turned on its side for thinner stuff.
Use it to remove offcuts from between the saw blade and the fence.
Rebates and Grooves
For people who do not own a high-speed router, the circular saw bench is an effective tool for making accurate rebates (rabbets) and grooves. In UK factory regulations there is an injunction against making any rebate, mould or groove unless that part of the the saw blade or other cutter which is above the machine is effectively guarded.
'Shaw Guards' are described in the section onGuards.
Stopped work or Breaking-in
Stopped work involves making rebates (rabbets) or grooves (including housings cut with dado sets) that run from one side/end of a workpiece to a point short of the other side/end. (This is an action contrary to the UK woodworking regulations) T
This means that the crown guard and riving knife must usually be removed.
At the completion of the cut, the workpiece has to be safely lifted upwards from the blade (usually left running since the operator will have difficulty in reaching the on/off switch) and moved out of the way. While this is happening there is a chance of the work being snatched by the teeth and ejected out of the worker's hands. There is a considerable risk of the hands then following onto the saw.
Breaking in involves dropping the workpiece onto a running saw, say to make such features that meet neither end of the workpiece. There can be a considerable risk of the wood being snatched by the crown teeth and ejecting the material.
Taking Off
To remove the cut pieces, a helper is often asked to stand at the delivery end of the saw, to assist by taking the weight of the overhanging parts of the workpiece and then return the offcut to the sawyer. Some guards are mounted on the riving knife by a pivot used to adjust the height of the front of the guard above the workpiece. This can mean that part of the rear of the blade projecting above the workpiece is exposed. The helper should not reach forwards before the wood is parted. His/her hands will be close to the saw teeth. Even if the riving knife is correctly set, it cannot be relied upon to prevent injury.
Don't allow any assistant to stand otherwise than at the delivery of the machine.
Some workers will have to work without assistance. As the centre of gravity of the workpiece approaches and then leaves the back of the table, the sawyer will need to apply increasing pressure to hold his end down, thereby making the situation more difficult to control. On a poor floor, a slip is possible. Stopping the cut to walk to the outfeed end of the board to pull the board through the saw can lead to mishaps, inefficient cutting and possible damage to the saw. If the work kicks back, the sawyers fingers can be damaged.
For people working alone, it is virtually imperative that a taking-off table or roller should be made. A table or roller is obligatory under British factory legislation. It requires that the distance between the saw spindle and the rear edge of the table shall be able not less than 1200mm (4ft).
It is the practice for some people who lack a taking-off table to make a cut half way along the job, to withdraw the work, turn it end to end and re-saw. When withdrawing the work, there is a risk from a nip as the end reaches the riving knife. It can become dislodged and be possibly ejected. The accident reports refer to serious injury to a sawyer when the nip actually dislodged the riving knife.
When not in use, freestanding rollers need not take up much space, yet they have a reputation that unless accurately aligned they tend to steer the outfeed end of the workpiece. Some devices now incorporate balls instead of rollers, although there can be difficulties with items of small cross-section. Make sure that they cannot easily be knocked over.