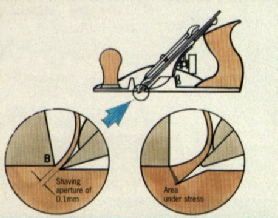

In the left hand inset, 'B' indicates the front lip of the mouth. The cutter is sharp. A 0.1mm (0.004inches) shaving is shown passing through the 'shaving aperture'. It rides some distance up the face of the cutter until it is deflected by the curved face of the cap iron. (Actually, a 0.1mm shaving is rather thick for finish work on a hardwood).
It indicates the ideal situation in which a finely-set shaving aperture enables the combined weight of the plane and the user to press downwards upon the fibres of the shaving.
The front lip of the mouth is shown filed by the user to a slight angle from the vertical. The intention is to ease the passage of shavings (usually less well-behaved than the one shown).
The grain is regarded as sloping downwards, ie the plane is working 'against the grain'.It could be called 'reverse grain'.
What appears to happen is that instead of being cut by the edge, the wood rives (splits) ahead of the cutter. It rides up the face of the cutter getting thicker, and therefore stronger, as the plane moves forwards. As it gets stronger the leverage applied by the cutter creates the area of stress indicated. Eventually, the fibres are torn out by their roots and we have the all-too-familiar tears in the wood's surface

The right-hand insetshows an exaggeratedly wider shaving aperture of about 5mm (0.2inches). Because the image has been doctored to show a blunt cutter, it appears rather higher than it should do.


The pictures we sometimes see of broken shavings (published elsewhere) are usually quite thick ones. Thick shavings made with a cutter that lacks a cap-iron will still break of their own accord.
As far as thin shavings are concerned, I think it is a mistake (though a very popular one) to say that the cap-iron to edge distance has much effect on the tearing. Some authors write that the cap-iron breaks the shaving and therefore reduces its effective length as a lever. However, a thin 'beam' will bend before it can do much levering. It is the lower section of the riven shaving that does the levering.
Naturally, it will do no harm to keep the cap-iron as close as possible before clogging happens. If a plane with a gnat's whisker shaving aperture clogs, try moving the cap-iron back a little and all will probably be well.
Have as fine a shaving aperture as possible and a very sharp cutting edge. Apply downwards pressure on the plane. Slewing the plane might help, but the plane is now travelling over a greater area. It can help to plane in a direction obliquely to the grain direction, ie planing somewhat across the grain.
Another dodge is to increase the effective cutting angle by forming a 5 - 10deg bevel on the forward face of the cutter. This creates more of a scraping action, but makes the plane harder to push.
The snag is that smoothing planes cannot reach small localised bad patches. The surrounding area has to be lowered to the same level so that the plane blade can reach.
The same applies to scraper planes, hence the smaller the sole of the scraper plane, the smaller the patch it can reach. Hand-held cabinetmaker's scrapers will work into a small area and can thereby create a distinct hollow. Unfortunately any unevenness can show on highly polished surfaces. Can't win can you?
Try to avoid torn patches in the first place. If, when working entirely by hand, your trying plane and jack plane have equally well-tuned apertures, the risk is reduced. Scrub plane across the grain (or diagonally across). If you are going to have stuff machined, do your best to check the quality of the current output of the planer in question.