
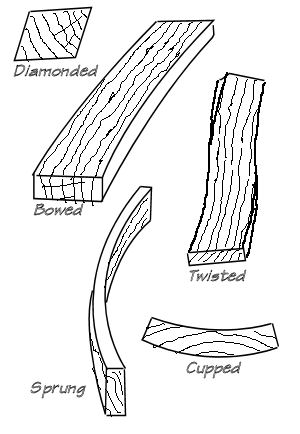
It would be naive to imagine that any single board would limit itself to only one form of sin. Quite likely, we are liable to find each and every one of these distortions in each piece, with one defect more evident than the others.
Certainly expect diamonding from any piece that has been stored for even a short time. Likewise cupping. Whatever people might tell you about laying cupped boards hollow side down on grass, you are unlikely to reliably flatten such work other than by planing excess wood to get to the rectangle that lies contained within it. If the stock lacks the substance to produce the dimensions you want, cupped work can be ripped and re-assembled byRub Jointingto produce a flatter piece.
Also expect plane-damaging defects such as embedded grit especially in the ends of boards previously stood on dirty floors.
Unless you can get a board directly from a planer/thicknesser and work on your joints without, delay, you'll be fortunate to find it that stays dead flat. 'Quarter sawn' material is less likely to cup, but don't forget that it could twist.
For most jobs, a jack plane with a cambered edge (How To Plane A Square Edge) will be most suitable, though for smaller jobs, a similarly set-up smoothing plane can be somewhat preferable. A 'trying plane' or 'jointer' will be suitable for very long work.
Since the aim should always be to avoid tearout as far as possible, make sure that all planes (except scrub planes) use a reasonably fine mouth (say 0.5mm (20thou)). For removing any tearout that you might get, seeCoping With Gnarly Grain. When working hardwoods, all but the toughest of he-men might find a 0.075mm (3thou) shaving requires hard work, so in fact, a shaving aperture can be less than the above.
Planing Drill:
First lift one end of the board and sight down the length to see whether the near edge is parallel to the far edge. If not, you will have to cope with twist - (Coping with Twist).
While you are at it, also check for bowing.
Twist it through 90° and check for springing.
A rule, or the edge of the plane's sole, across the width of the board will soon reveal the extent of any cupping.
Check the grain direction and choose the best compromise (Grain).
Select and plane the face side, ie the wider surface
Some say that this should be the best face, yet in some work (eg carcasses) the face side must lie on the inside of the job. Obviously in this case any slight defects should be on the face side.
Whichever face is to be the face side, it can be a good idea to start with the convex face lying on the bench top. While the workpiece might wobble as you plane, you can work so that the wood directly under the plane is supported by the bench top.
If the cupping is slight, you can often get away with slipping a few shavings, or perhaps a strip of card between the concavity and the bench top.
Once the hollow is removed, you can turn over and plane (if need be) a true face side without problems from deformation.
If you first work on the convex face, the weight of yourself plus the plane can distort boards less than, say, 50mm (2in) thick that will, of course, spring back when you remove the pressure. It is virtually impossible to stay sane while trying to work under such conditions.
If working on thick material straight from the sawmill, it can be desirable to firstly rough plane with a short and narrow 'scrub' plane. Plane directly or diagonally across the grain. In this case you can probably work start work on the convex face to produce a moderately flat surface. To prevent 'breaking out', form a low-angle chamfer on the far side of the job.
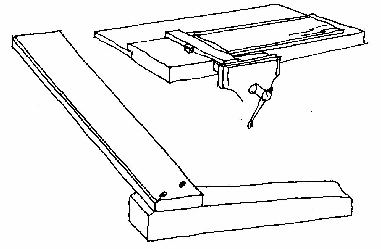
A particular frustration when planing wide work is the need to constantly shift the job so that your plane always aims at the bench stop. If you don't, the work will slew around and probably clatter onto the floor, inevitably landing on a corner.
The back edge of the blade of the planing stop must, of course, rest against the bench stop. Make the stock with a slightly tilted upper surface. When fitting in the vice, you will need to press the 'stock' downwards to form a bit of springiness that will hold it flat against the bench top.

Test across and along the grain with suitable straightedges.
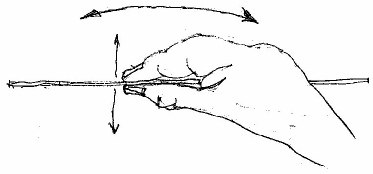
Take care if testing with a steel ruler. They are often somewhat bent, so unless its face is held dead vertically, you can get a false concave or convex reading, depending on the way it is tilted.
You can avoid the effort of lifting a job and holding it and the rule against the light. (On heavy work, this will be out of the question anyway).
Using a flexible rule, press the edge downwards and press sideways as illustrated. If you can flex the rule, the surface is concave. It you can swivel it, then you are resting on a convex surface. A 'gritty' feel can indicate a flat surface.
Mark with the traditionalface side mark.
The vee of the FE mark should join the FS mark. By avoiding the need to lift the work to find the marks, this scheme makes it easier to locate the datum surfaces on large and heavy work.
Test for twist with winding rods, or if you want to be fancy, with a spirit level (Twist).
A quick test for twist is to apply a straightedge diagonally. If twisted, one diagonal will read a hollow and the other a convexity. To find out how to plane this out, look at the diagram on the 'Twist' page.
Plane the face edge, straight and at right-angles to the face side. Apply the traditionalface edge mark.
For advice about this, seeRub Jointing.
Thin stuff is best planed on a shooting board -A Versatile Shooting Board.
The tail of the FS mark should shoot off the edge of the board.
Set a marking gauge (or panel gauge) to the required width. Working against the face edge, 'gauge to width'.
Plane down to the gauge lines.
For details of the gauges seeMake Your Own Gauge.
As the width approaches the limit, you can often see the arrises getting lighter as light creeps through the gauge line.
You can also test for closeness by fraying the arrises with your thumb.
When you reach the line, you should be able to detect 'witness marks' left by the gauge pin as it scratched the wood. Stop at this point!
Planing first to width reduces the amount of work involved in planing the reverse face.
Set a marking gauge to the required thickness. Working against the face side, gauge right round the perimeter of the workpiece.
Plane down to the lines. Since there can be quite a lot of wood to remove, this can be easier said than done.
When you have finished, you should have witness marks running around the entire perimeter of this surface.